|
The Pinball Game
Game Physics with Bespoke Code
|
|
The Pinball Game
Game Physics with Bespoke Code
|
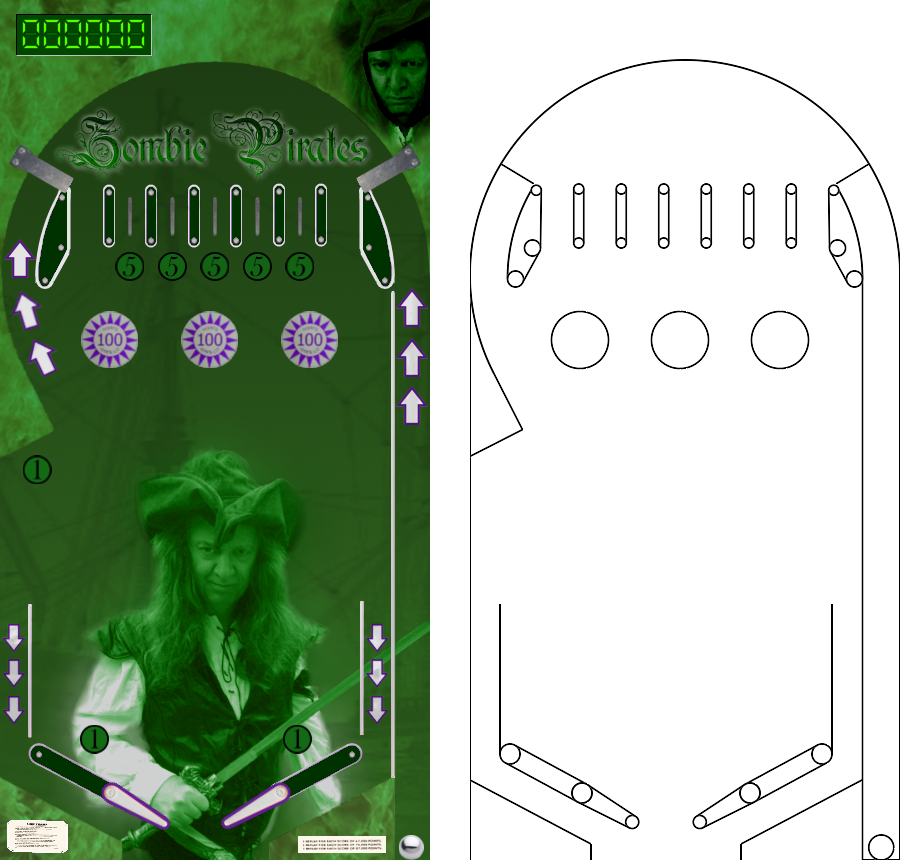
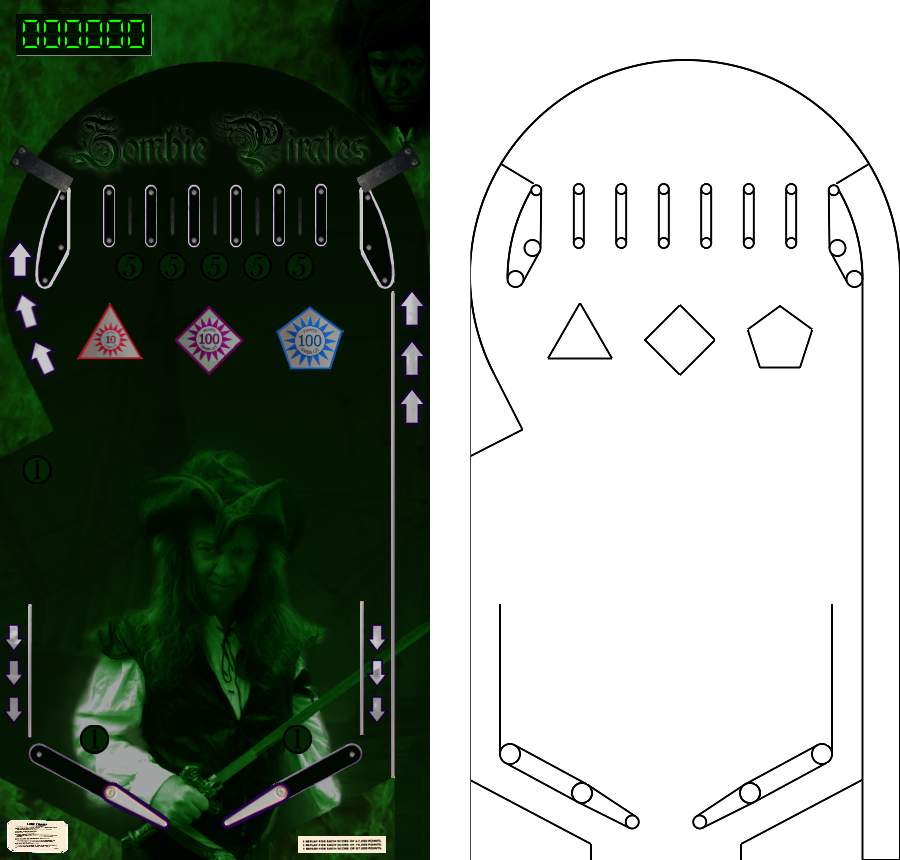
This is a rudimentary pinball machine designed to put the Shapes Library library we developed for the Collision Math Toy to good use. The aim of the game is to get as high a score as you can. In addition to being a minigame that you can actually play, the Pinball Game allows the player to change the draw mode from the normal "sprites only" mode in which the game will be shipped (Fig. 1, left), a "sprites and lines" mode in which the shapes are drawn in black over the sprites so that you can check that the sprites actually align with the shapes (Fig. 1, middle), and "lines only" mode (Fig. 1, right) because it looks cool. The game can be played in any of the three draw modes.
The remainder of this page is divided into five sections. Section 2 lists the controls and their corresponding actions, Section 3 tells you how to build it, Section 4 gives you a list of actions to take in the game to see some of its important features, Section 5 gives a breakdown of the code, Section 6 contains some programming problems, and Section 7 addresses the question "what next?".
| Help (this document) | |
| Toggle frame rate display | |
| Toggle draw mode from "sprites only", to "sprites and lines", to "lines only" | |
| Load a ball (first press) and launch it (second press) | |
| Left flipper up while key is down | |
| Right flipper up while key is down | |
| Save screenshot to a file | |
| Quit game and close the window |
This code uses SAGE and the Shapes Library. Make sure that you have followed the SAGE Installation Instructions and the Shapes Library Build Instructions. Navigate to the folder 4. Pinball Game in your copy of the sage-physics repository. Run checkenv.bat to verify that you have set the environment variables correctly. Open Pinball Game.sln with Visual Studio and build the Release configuration. The Release executable file Pinball Game.exe will appear. Alternatively, run Build.bat to build both Release and Debug configurations.
Do I have to tell you how to play pinball? Refer back to Section 2 to see the flipper and ball launch keys.
This code uses the Shapes Library and some code from the Collision Math Toy to make a rudimentary pinball game. The most challenging part of the code is the creation of the shapes in the play area as shown in Fig. 1, right. This is done in CGame::BeginGame by calling CObjectManager::MakeWorldEdges to make various static edges and arcs, and CObjectManager::MakeShapes to make the other various shapes, which in turn calls CObjectManager::MakeBumper, CObjectManager::MakeBollard, CObjectManager::MakeFlipper, CObjectManager::MakeThingL, CObjectManager::MakeThingR, and CObjectManager::MakeShape.
For the following problems you can either work directly in the folder 4. Pinball Game in your copy of the sage-physics repository, or (recommended) make a copy of the folder 4. Pinball Game in some place convenient (for example, the Desktop or your Documents folder) and work there.
CObjectManager to create a regular polygonal bumper with n sides, centered at p, with elasticity e, sprites unlit and lit, which when hit makes sound snd and adds nScore to the score. Each polygonal bumper will be an instance of Shapes::CCompoundShape. void CObjectManager::MakeBumper(UINT n, const Vector2& p, float e,
eSprite unlit, eSprite lit, eSound snd, int nScore)
{
if(n < 3)ABORT("Too few edges in polygon");
CObjDesc nullObjDesc(eSprite::None, eSprite::None, snd);
CObjDesc bumperObjDesc(unlit, lit, snd);
bumperObjDesc.m_nScore = nScore;
CObjDesc lineDesc(eSprite::BlackLine, eSprite::BlackLine, snd);
Shapes::CPointDesc pointDesc(p);
Shapes::CShape* pCenterPoint = AddShape(&pointDesc, bumperObjDesc);
Shapes::CCompoundShape* pBumper = new Shapes::CCompoundShape(pCenterPoint);
} //MakeBumper
pBumper. Then in CObjectManager::MakeShapes, replace the lines MakeBumper(Vector2(mid + 14.0f - dx, y), e, unlit, lit, snd); MakeBumper(Vector2(mid + 14.0f, y), e, unlit, lit, snd); MakeBumper(Vector2(mid + 14.0f + dx, y), e, unlit, lit, snd);
Vector2 pos = Vector2(mid + 14.0f - dx, y);
MakeBumper(3, pos, e, eSprite::UnlitTriangle, eSprite::LitTriangle, snd, 10);
pos.x += dx;
MakeBumper(4, pos, e, eSprite::UnlitSquare, eSprite::LitSquare, snd, 100);
pos.x += dx;
MakeBumper(5, pos, e, eSprite::UnlitPentagon, eSprite::LitPentagon, snd, 100);
CObjectManager::NarrowPhase to make the polygonal bumpers light up when hit.std::vector<Shapes::CCompoundShape*> m_vBumperList;
CObjectManager::MakeBumper from Problem 4.1. Then at the end of CObjectManager::NarrowPhase, if the local variable bHit is true then use the function CCompoundshape::IsPartOf to check whether pShape is a part of each bumper. If so, then get the bumper's central point using CCompoundShape::GetCenterPoint, then get a pointer to the bumper object by using that point's CShape::GetUserPtr function and casting it to CObject*. You can then set the object's CObject::m_bRecentHit and CObject::m_fLastHitTime to the appropriate values, which will then make the bumpers light up when hit. Next, take a look at the Ball and Spring Toy.