 |
The 8-ball Pool End Game
Game Physics with Bespoke Code
|
|
The 8-ball Pool End Game
Game Physics with Bespoke Code
|
This is the Pool End Game, a simple minigame that uses hand-written physics code based on Euler integration.
The remainder of this page is divided into six sections. Section 2 lists the controls and their corresponding actions, Section 3 tells you how to build it, Section 4 gives you a list of actions to take in the game to see some of its important features, Section 5 gives a breakdown of the code, Section 6 contains some programming problems, and Section 7 addresses the question "what next?".
| Exit | |
| Help (this document) | |
| Toggle frame rate | |
| Toggle step mode | |
| Toggle collision mode | |
| Move cue ball upwards on the base line | |
| Move cue ball downwards on the base line | |
| Rotate impulse vector counterclockwise | |
| Rotate impulse vector clockwise | |
| Rotate impulse vector counterclockwise fast | |
| Rotate impulse vector clockwise fast | |
| Fire cue ball/start new game/take step in Step Mode | |
| Save screenshot to a file | |
| Quit game and close the window |
This code uses SAGE. Make sure that you have followed the SAGE Installation Instructions. Navigate to the folder 1. Pool End Game in your copy of the sage-physics repository. Run checkenv.bat to verify that you have set the environment variables correctly. Open Pool End Game.sln with Visual Studio and build the Release configuration. The Release executable file Pool End Game.exe will appear. Alternatively, run Build.bat to build both Release and Debug configurations.
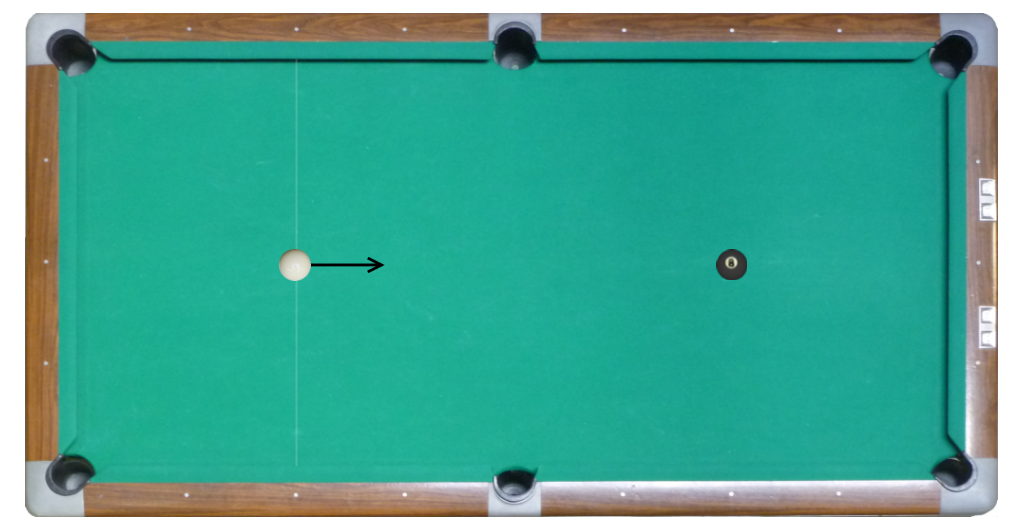
The aim of the game is to sink the 8-ball while not sinking the cue-ball. The initial state of the game is shown in Fig. 1, with the cue-ball on the base line to the left and the 8-ball on the dot at the right. An arrow shows the direction that the cue-ball will travel when hit by the imaginary cue, which will happen when the player hits the Space bar. We can call this vector the impulse vector. Before the initial hit, the player can move the cue-ball up and down on the base line by holding down the up and down arrow keys. For example, Fig. 2 shows the cue-ball moved up along the base line.
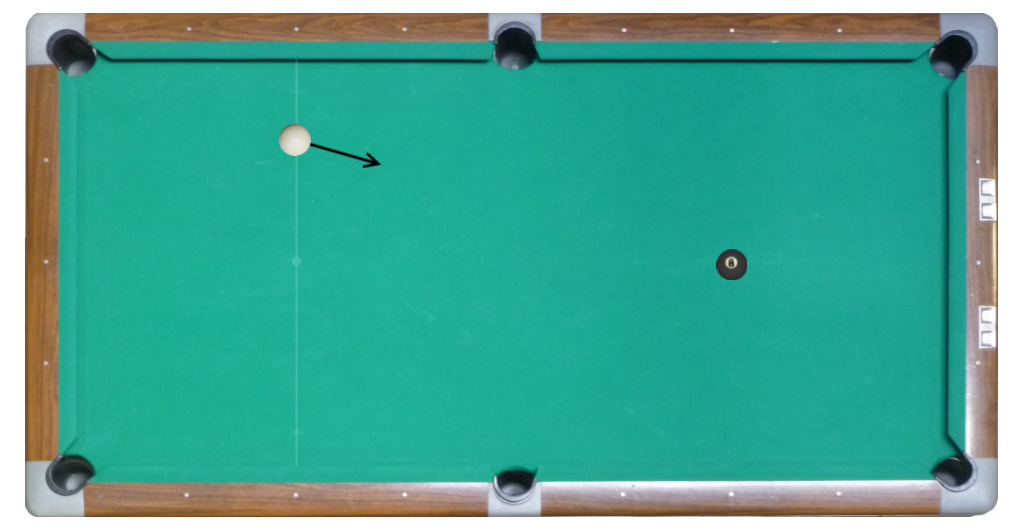
Notice that, as shown in Fig. 2, the impulse vector always points to the 8-ball while the cue-ball is moved up or down along the base line. The player can rotate the impulse vector by holding down the appropriate key (see Section 2). For example Fig.3 shows the impulse vector rotated slightly counterclockwise from the center of the 8-ball.

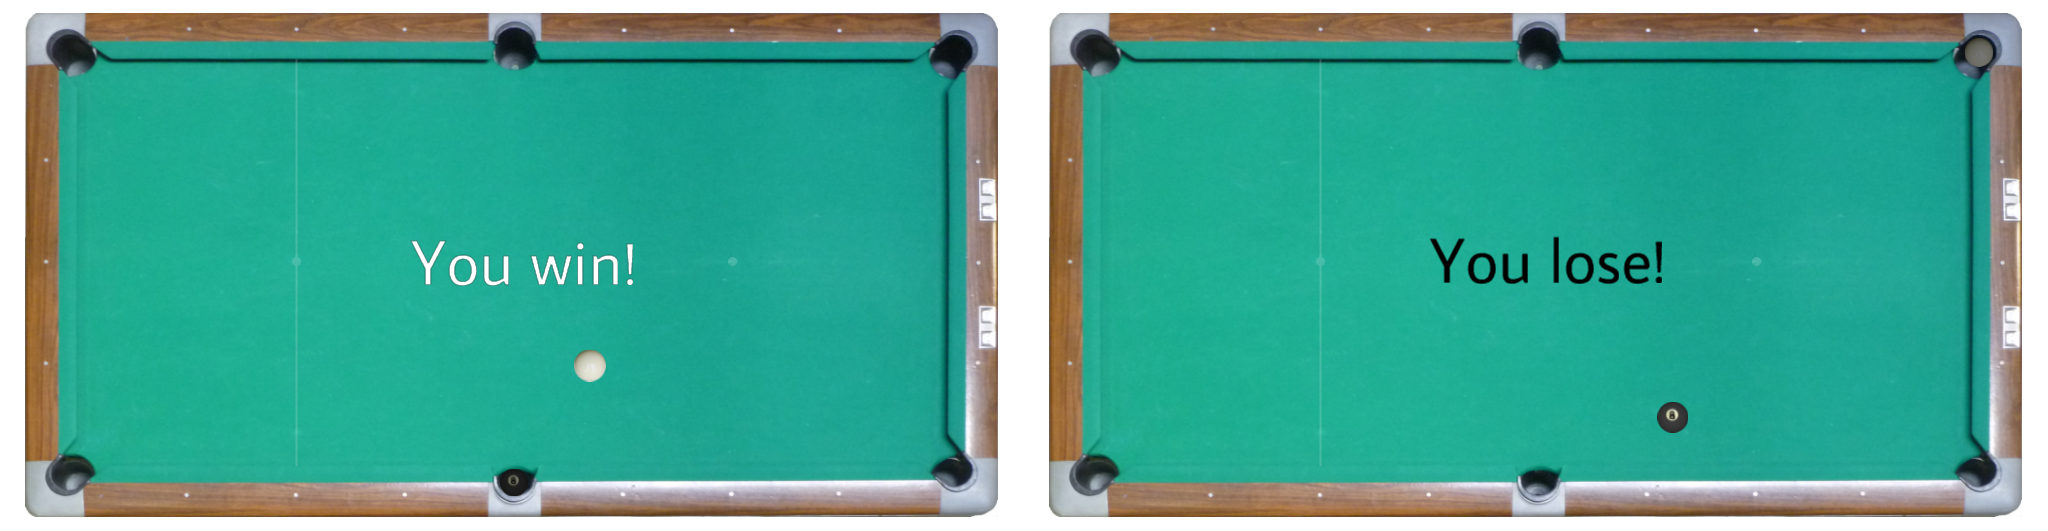
The impulse vector is hidden when the balls are in motion. The impulse vector reappears when the balls come to rest, pointing to the center of the 8-ball. At this point the player can rotate the impulse vector using the same keys as before, and shoot using the Space bar. Eventually (depending on the skill of the player) either the cue-ball will go into one of the six pockets at the corners and horizontal centers of the table, in which case the player loses the game (see Fig. 4, right), or the 8-ball goes into a pocket while the cue-ball remains on the table, in which case the player wins (see Fig. 4, left).
After a short pause, or when the player hits the Space bar, the game begins again as shown in Fig. 1.
In addition to being a minigame that you can actually play, the Pool End Game allows the player to toggle in and out of step mode in which the ball advances by 1/30th of a second each time the space bar is pressed and leaves a trail of markers as shown in Fig. 5. Step Mode is intended to help the player visualize the discrete nature of video game time (see Section 5.1). When the game is in step mode a pair of footprints will appear at the lower left corner of the table, as shown in Fig. 5.
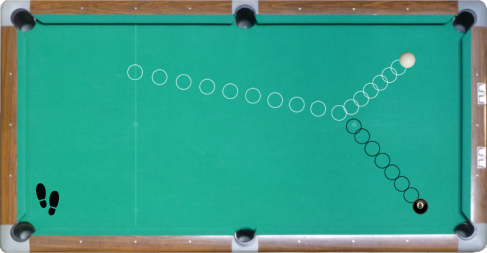
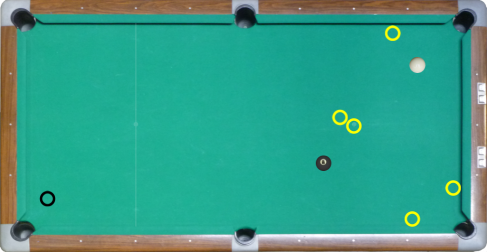
The player can also toggle in and out of collision mode, which displays yellow circles at the positions of the balls at time of impact with each other and with the rails. When the game is in collision mode a small black circle will appear at the lower left corner of the table, as shown in Fig. 6.
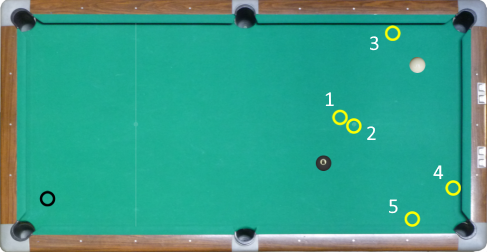
Suppose we number the yellow collision circles from Fig. 6, as shown in Fig. 7. Circles 1 and 2 are from a collision between the cue-ball (the left circle) and the 8-ball (the right circle). The cue-ball travels up and to the right and collides with the top rail at circle 3, rebounding to the position shown. At the same time the 8-ball collides with the right rail at circle 4, then the bottom rail at circle 5, rebounding to the position shown.
This section assumes that you have fully read and understood the documentation for SAGE and The Blank Game. The most interesting parts of this code from a game physics perspective are the object motion code in CObject and the collision detection and response code in CObjectManager. These are covered in Section 5.1 and Section 5.2, respectively.
The CObject is the abstract representation of an object, which in this game means the cue-ball and the 8-ball. CObject stores, among other things, an object's position CObject::m_vPos and velocity vector CObject::m_vVel. Don't be distracted by CObject::m_vOldPos, which is used solely to determine where to drop a circle particle in step mode (see Section 4.2). CObject::Move handles ball motion and CObject::DeliverImpulse delivers an impulse for when the player hits the cue-ball. These are described in Section 5.1.1 and Section 5.1.2, respectively.
Function CObject::Move gets called once per animation frame for each of the balls, resulting the the balls skipping across the table in discrete jumps. However, if the frame rate is high enough, the human brain will interpret the jaggy motion as one continuous sweep. See Euler Integration for the full explanation. Step mode will help you to visualize this (see Section 4.2).
Function CObject::DeliverImpulse for the cue-ball object gets called from CObjectManager::Shoot, which is called from CGame::KeyboardHandler in response to the player pressing the space bar when all balls are stopped and are not in pockets. Rather than messing around with forces, this function takes an angle \(a\) and a magnitude m and sets the velocity of the ball to m times the vector with orientation a. The latter is obtained by calling Sage::AngleToVector(a). CObjectManager keeps the current cue orientation in CObjectManager::m_fCueAngle which it provides as parameter a to CObject::DeliverImpulse. CObjectManager::m_fCueAngle is adjusted using CObjectManager::AdjustCueBall, which is called from CGame::KeyboardHandler in response to player input (see Section 2).
CObjectManager's most important task in this game is collision detection and response. CObjectManager::BroadPhase is called once per frame and it handles the detection of and response to collisions between the balls and other balls, the rails (the horizontal and vertical walls near the edges of the table in Fig. 1), and the pockets. CObjectManager::BroadPhase calls CObjectManager::NarrowPhase which performs collision detection and response between the two balls. CObjectManager::BroadPhase also calls CObjectManager::RailCollide for detection of and response to collision between a ball and a rail, and CObjectManager::PocketCollide for detection of and response to collision between a ball and a pocket. These are covered in Section 5.2.1, Section 5.2.2, and Section 5.2.3, respectively.
Suppose we call the balls that are colliding \(B_1\) and \(B_2\), and that they are moving with velocities \(\vec{v}_1\) and \(\vec{v}_2\), respectively. Let \(\vec{v}\) be the velocity of \(B_2\) relative to \(B_1\), that is \(\vec{v} = \vec{v}_2 - \vec{v}_1\). Suppose that at the end of the frame we detect an overlap between \(B_1\) and \(B_2\), and that this is the first frame in which an overlap occurs between \(B_1\) and \(B_2\). In the Fig. 8 \(B_1\) is brown, \(B_2\) is yellow, and \(B_2\) is moving along the dotted line with velocity \(\vec{v}\) relative to \(B_1\). Note that at the time this overlap between the balls has been detected, \(B_2\) may be approaching or moving away from \(B_1\) (we have drawn it as moving away).
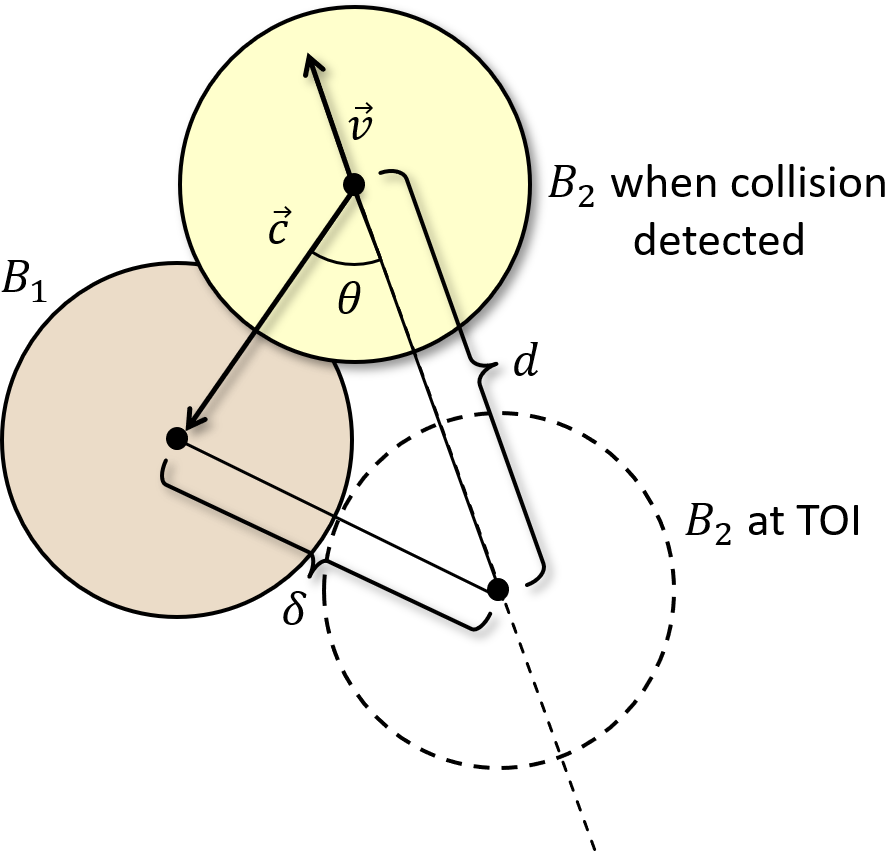
The actual time of impact (TOI for short) between \(B_1\) and \(B_2\) would probably be between animation frames. We would expect that the position of \(B_2\) at the TOI would be the dotted circle in Fig. 8. We need to calculate \(d\), the distance that \(B_2\) needs to be moved back to its position at TOI. Let \(\vec{c}\) be the vector fom the center of \(B_2\) to the center of \(B_1\), \(\delta\) be the distance between the center of \(B_1\) and the center of \(B_2\) at TOI, and \(\theta\) be the angle between \(\vec{c}\) and \(-\vec{v}\), as shown in Fig. 8. By the law of cosines,
\[\delta^2 = d^2 + \left\Vert\vec{c}\right\Vert^2 - 2d\left\Vert\vec{c}\right\Vert \cos \theta.\]
Since \(\left\Vert\vec{c}\right\Vert = -\hat{v} \cdot \vec{c}\) and \(\left\Vert\vec{c}\right\Vert^2 = \vec{c} \cdot \vec{c}\),
\[ d^2 + \vec{c} \cdot \vec{c} + 2d\hat{v} \cdot \vec{c} - \delta^2 = 0. \]
This is a quadratic equation in \(d\) whose roots are
\[d = -\hat{v} \cdot \vec{c} \pm \sqrt{(\hat{v} \cdot \vec{c})^2 - \vec{c} \cdot \vec{c} + \delta^2}.\]
We need the first root
\[d = -\hat{v} \cdot \vec{c} + \sqrt{(\hat{v} \cdot \vec{c})^2 - \vec{c} \cdot \vec{c} + \delta^2}.\]
Note that if \((\hat{v} \cdot \vec{c})^2 - \vec{c} \cdot \vec{c} + \delta^2 < 0 \), then there is no collision. This should not happen if we perform this computation only if there is overlap between the two circles, but it may still happen due to floating point roundoff error.
Now we can compute \(\delta_t = \left\Vert\vec{v}\right\Vert/d\), the time elapsed since TOI. Suppose that at the time the collision was detected \(B_1\) was at position \(\vec{p}_1\) and \(B_2\) was at position \(\vec{p}_2\). Let \(\vec{q}_1\) be the position of \(B_1\) at TOI, and \(\vec{q}_2\) the position of \(B_2\) at TOI. Then, we can compute \(\vec{q}_1 = \vec{p}_1 - \delta_t\vec{v}_1\) and \(\vec{q}_2 = \vec{p}_2 - \delta_t\vec{v}_2\).
Now we need to compute the velocities of \(B_1\) and \(B_2\) after the impact. Let \(\vec{n}\) be the vector from \(\vec{q}_2\) to \(\vec{q}_1\), that is, \(\vec{n} = \vec{q}_1 - \vec{q}_2\). At TOI \(B_1\) and \(B_2\) swap the components of their velocity parallel to \(\vec{n}\), by the Laws of Conservation of Kinetic Energy and Conservation of Momentum (see here for details).
Let \({\vec{v}_1}'\) and \({\vec{v}_2}'\) be the velocities of \(B_1\) and \(B_2\), respectively, after the impact. Then \({\vec{v}_1}' = \vec{v}_1 + (\vec{v} \cdot \hat{n})\hat{n}\) and \({\vec{v}_2}' = \vec{v}_2 - (\vec{v} \cdot \hat{n})\hat{n}\). \(B_1\) and \(B_2\) will have been moving from their positions at TOI with those respective new velocities for time \(\delta_t\). Their new positions are therefore \(\vec{q}_1 + \delta_t {\vec{v}_1}\) and \(\vec{q}_2 + \delta_t {\vec{v}_2}\), respectively.
Collision of a ball with a line is easier if we consider only horizontal and vertical lines. Fortunately, the rails in the Pool End Game are horizontal and vertical. Consider the case of a ball colliding with a horizontal line from below. Again, the actual collision occurs between frames and overlap between the ball and the line might be detected at the end of a frame. Suppose that, as show in Fig. 9, the yellow ball is moving along the dotted line from bottom left to top right of the figure at velocity \(\vec{v} = [v_x, v_y]\) and the collision is detected when it is at position \(\vec{p} = [p_x, p_y]\). Further suppose that the horizontal line has equation \(y = w_y\). We want to compute the point of impact (POI for short) so that, for example, we can play a particle effect or sound effect at POI. From Fig. 9, the POI has coordinates \([p_x - d_1 - d_2, w_y]\).
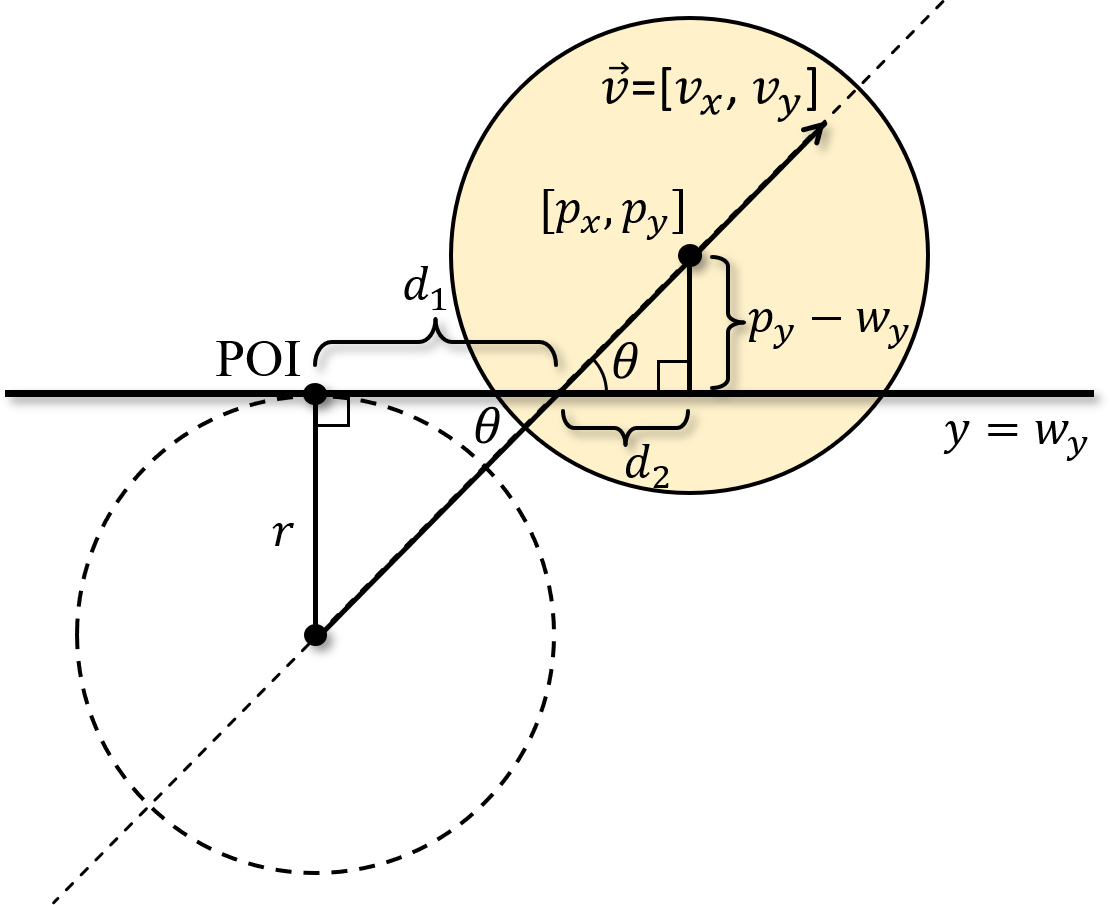
Consider the upper right triangle in Fig. 9. By observation, \(\tan \theta = (p_y - w_y)/d_2\). However, \(\tan \theta\) is also equal to \(v_y/v_x\). Therefore, \(v_y/v_x = (p_y - w_y)/d_2\), that is, \(d_2 = (p_y - w_y)v_x/v_y\). Now consider the lower left triangle in Fig. 9. By observation, \(\tan \theta = r/d_1\), where \(r\) is the radius of the ball. Therefore, \(v_y/v_x = r/d_1\), that is, \(d_1 = rv_x/v_y\). Putting these things together, the coordinates of the POI are \([p_x - (r + p_y - w_y)v_x/v_y, w_y]\).
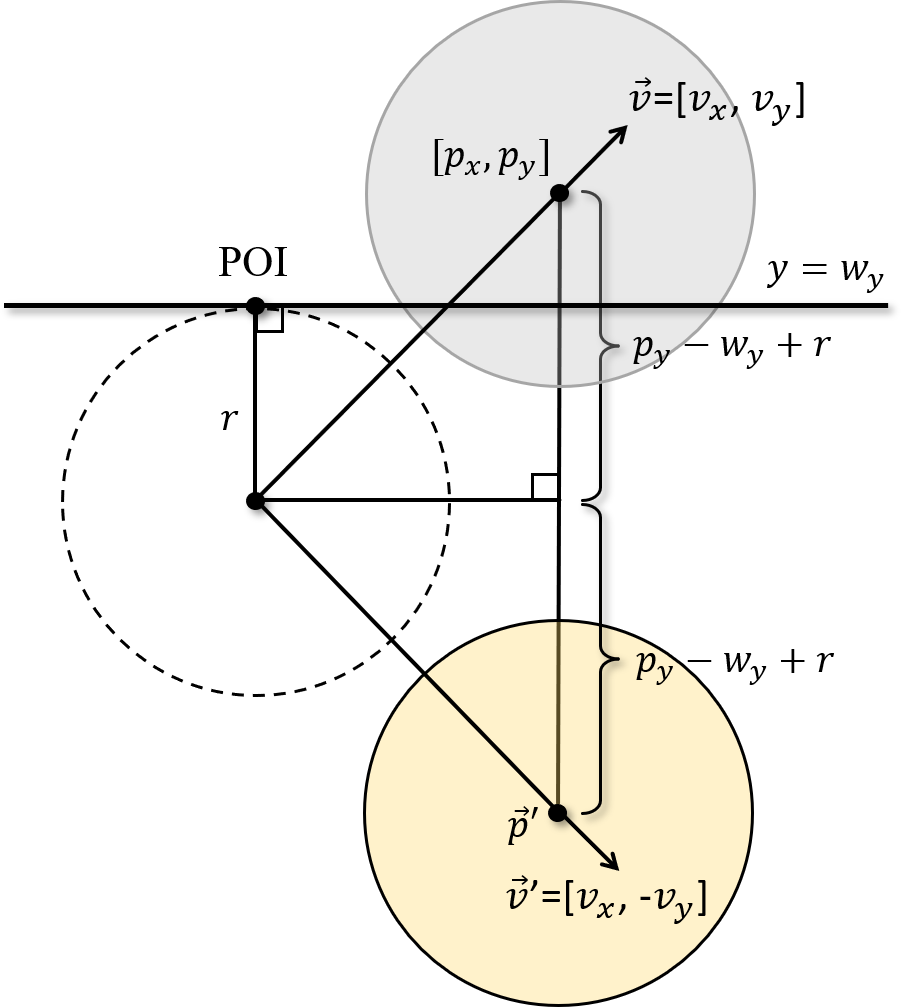
Now consider Fig. 10. The gray circle is the position of the ball when the collision is detected, the dotted circle is its position at TOI, and the yellow circle is its corrected position at the end of the frame. The ball will have moved downwards a distance equal to its upward travel from TOI, that is \(p_y - w_y + r\). The ball's corrected position is therefore \(\vec{p}' = [p_x, 2(w_y - r) - p_y]\). Similarly, the component of its velocity perpendicular to the line gets reversed, so its corrected velocity at the end of the frame is \([v_x, -v_y]\).
This concludes collision of a ball with a horizontal line from below. The other three cases needed for this game, collision of a ball with a horizontal line from above (the bottom rail), collision of a ball with a vertical line from the left (the right rail), and collision of a ball with a vertical line from the right (the left rail), are similar. See the code for CObjectManager::RailCollide for more details.
Collision of a ball with a pocket is fairly easy. For example, if a ball collides with the top and right rails, then it is deemed to have fallen into the pocket at the top right of the table. While this is much simpler than the behavior of a ball in a real world game of pool, it is sufficient for this game.
For the following problems you can either work directly in the folder 1. Pool End Game in your copy of the sage-physics repository, or (recommended) make a copy of the folder 1. Pool End Game in some place convenient (for example, the Desktop or your Documents folder) and work there.
CObjectManager::Draw. Once you have computed the position of the cue ball at time of impact into a local variable, say vCueBallPosAtTOI of type Vector2, you can draw a circle there with the following code: Sage::CSpriteDesc2D sd; sd.m_nSpriteIndex = (UINT)eSprite::Circle; sd.m_vPos = vCueBallPosAtTOI; sd.m_f4Tint = XMFLOAT4(Colors::AntiqueWhite); m_pRenderer->Draw(&sd);
m_pCueBall->m_vPos to the its position at time of impact vCueBallPosAtTOI found in Problem 1.1, add the following line of code in the appropriate place in CObjectManager::Draw. m_pRenderer->DrawLine(eSprite::Line, m_pCueBall->m_vPos, vCueBallPosAtTOI, Colors::AntiqueWhite);
DrawLineToRail(const Vector2& p, float theta, XMVECTORF32 c)
CObjectManager and write code to draw a line from point p at orientation theta in color c. You can do this by computing the point of intersection of the line with a rail in vIntercept and calling m_pRenderer->DrawLine(eSprite::Line, p, vIntercept, c);
CCommon::m_fXMargin, CCommon::m_fYMargin, Sage::CSettings::m_nWinWidth, and Sage::CSettings::m_nWinHeight Call your new function CObjectManager::DrawLineToRail from CObjectManager::Draw once for the cue-ball and once for the 8-ball when appropriate. The lines for the cue-ball should have color parameter c equal to Colors::AntiqueWhite for the cue-ball lines and Colors::Magenta for the 8-ball lines. Next, take a look at the Shapes Library.