 |
Ned's Turkey Farm
A Simple 2.5D Side Scroller
|
|
Ned's Turkey Farm
A Simple 2.5D Side Scroller
|
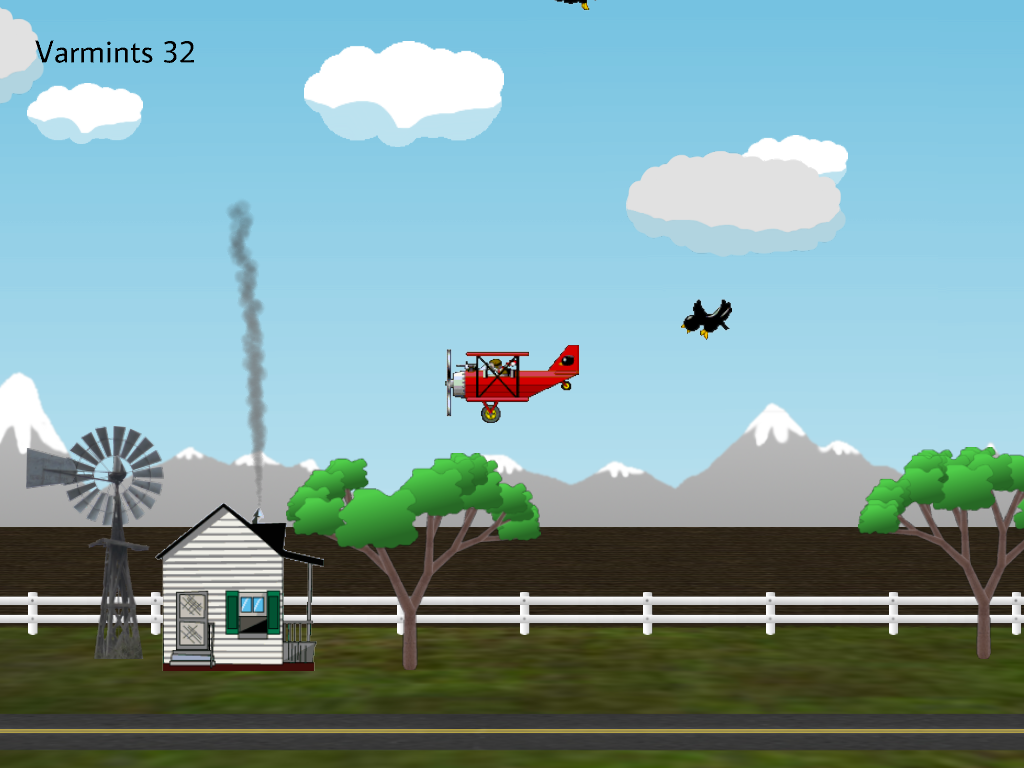
Ned's Turkey Farm is a simple 2.5D side scroller with graphics, particle effects, and sound in which you pilot a plane and kill crows. The plane moves leftwards just to challenge your preconceptions about side scrollers. Fig. 1 shows a screen shot.
| Help (this document) | |
| Toggle frame rate display | |
| Show 3D view | |
| Gain height | |
| Lose height | |
| Move faster (hold down) | |
| Move slower (hold down) | |
| Shoot | |
| Restart game | |
| Save screenshot to a file | |
| Quit game and close the window |
This code uses SAGE. Make sure that you have followed the SAGE Installation Instructions. Navigate to the folder 3. Tiled Platformer in your copy of the sage-games repository. Run checkenv.bat to verify that you have set the environment variables correctly. Open Tiled Platformer.sln with Visual Studio and build the Release configuration. The Release executable file Tiled Platformer.exe will appear. Alternatively, run Build.bat to build both Release and Debug configurations.
Run Ned's Turkey Farm.exe and do the following.
F3 key to cycle through the draw modes so you can see what is really going on in 3D (see Fig. 8, Fig. 9, and Fig. 10.). 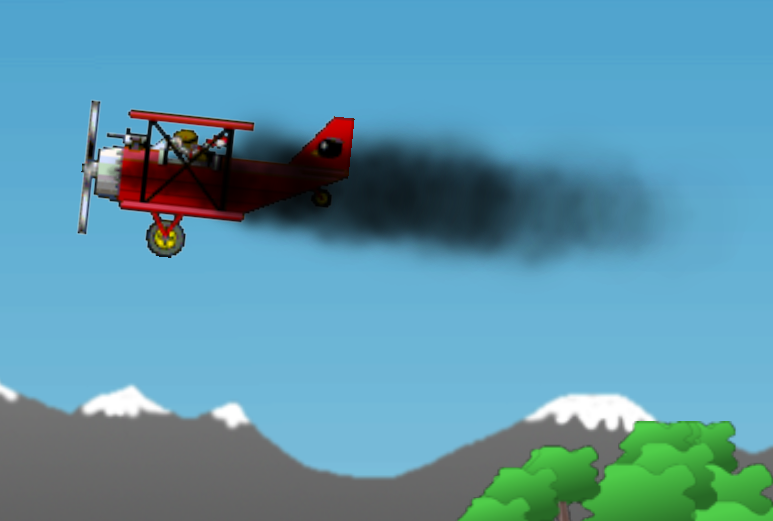
Open Ned's Turkey Farm.sln in Visual Studio and examine the code in the editor while you read the rest of this section. This section assumes that you have read and understood the documentation from SAGE, The Blank Game, The Top Down Game, The Top Down Tiled Game and The Tiled Platformer. How does this code differ from those games? Most importantly, we must now deal with the third spatial dimension (Section 5.1),which means that we must depth-sort our sprites (Section 5.2),and make a 3D background which we will wrap at the edges to make an infinite repeating game world (Section 5.3).
Ned's Turkey Farm is a 2.5D game, which means that it is a 3D game with 2D sprite art. It has its own renderer class CRenderer which is derived from Sage::CSpriteRenderer and is instantiated with
Sage::CSpriteRenderer(Sage::eSpriteMode::Unbatched3D)
whereas previous SAGE games (The Blank Game, The Top Down Game, The Top Down Tiled Game and The Tiled Platformer) used
Sage::CSpriteRenderer(Sage::eSpriteMode::Batched2D)
Sprite descriptors are now 3D, that is, Sage::CSpriteDesc3D is used instead of Sage::CSpriteDesc2D. While Sage::CSpriteDesc2D::m_vPos is a 2D vector Vector2, Sage::CSpriteDesc3D::m_vPos is a 3D vector Vector3, which has a third coordinate for the Z axis. The Z axis is at right angles to both the X and Y axes, but there are two directions to choose from. If the X axis is along the bottom of your screen with positive X to the right and the Y axis is along the side of your screen with positive Y upwards, then there are two choices for the positive Z axis. It can either point into the screen or out of the screen. Either choice is as good as the other but you must make sure that all of your code is consistent with this choice.
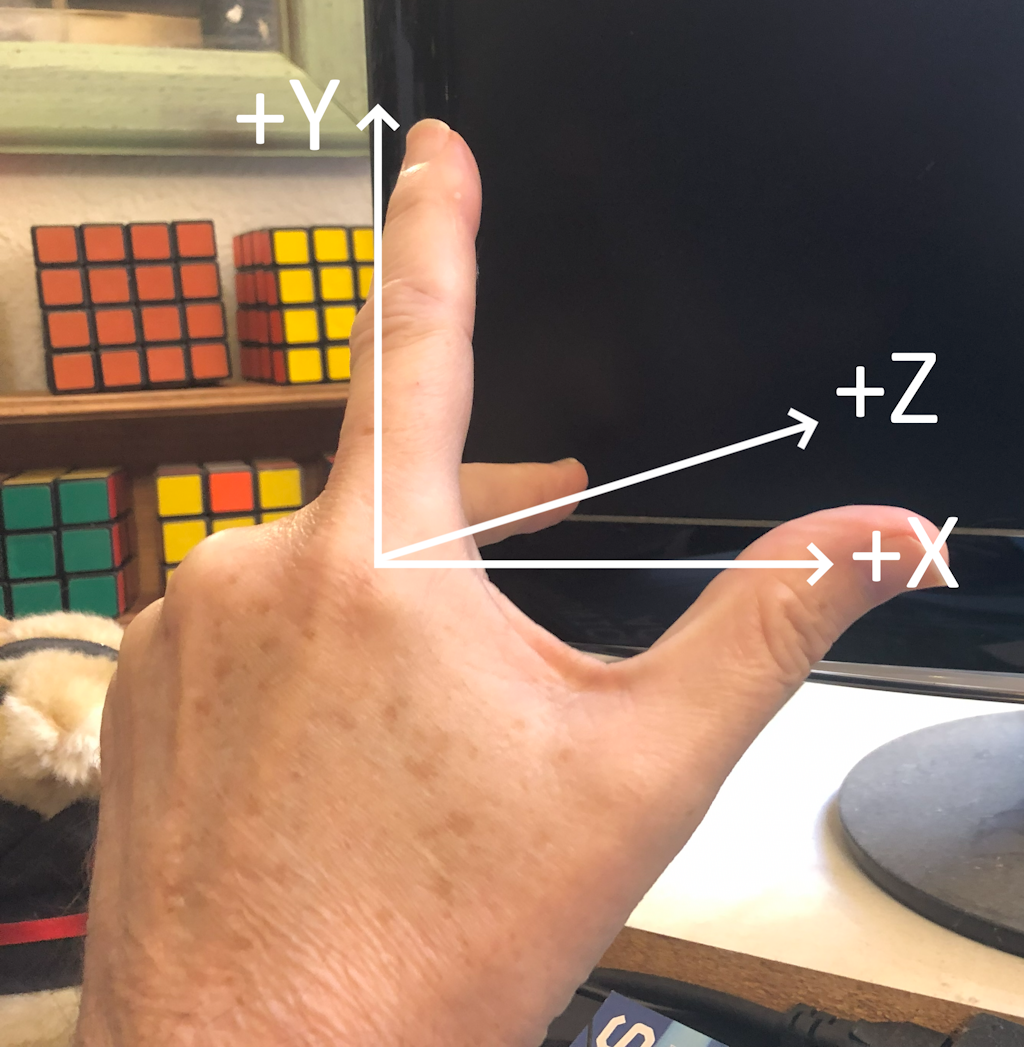
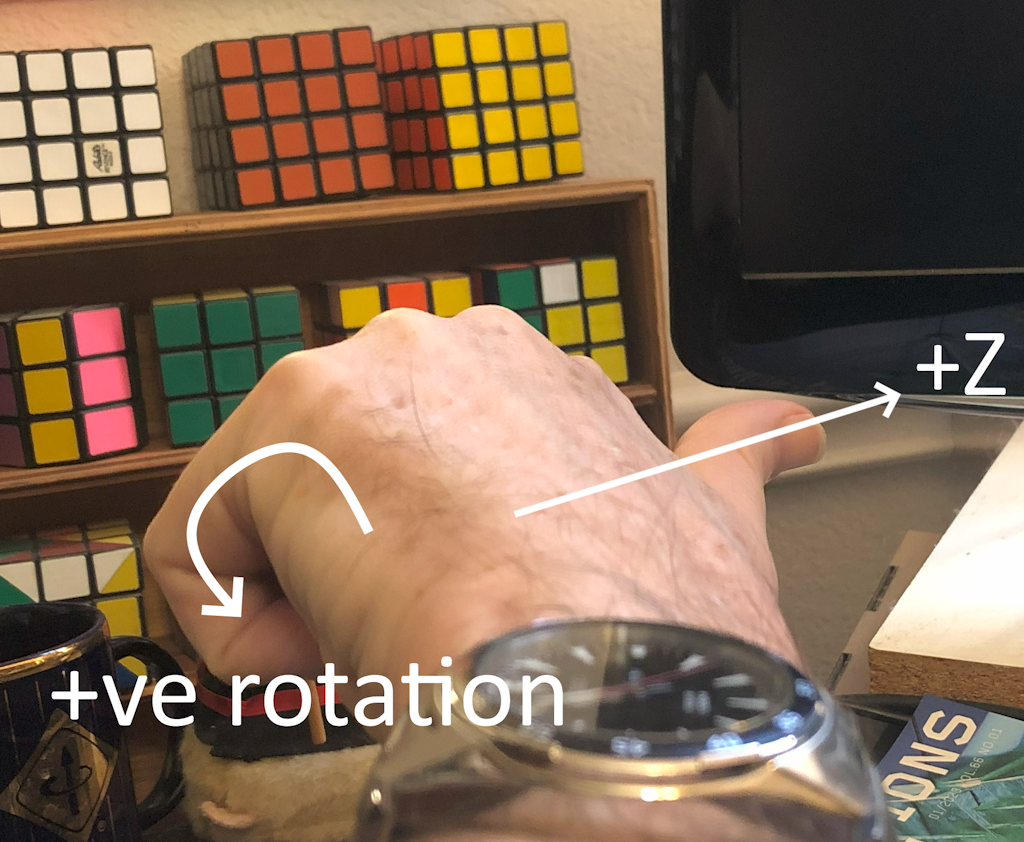
SAGE uses what is called a left-handed coordinate system. Take your left hand and make your thumb point towards positive X, your index finger to positive Y, and put your third finger at right angles to them. Then your third finger points in the direction of positive Z, into the screen as shown in Fig. 3. Similarly, using your right hand points your third finger in the opposite direction, out of the screen, in what is called a right-handed coordinate system.
Sage::CSpriteDesc2D has one rotation angle Sage::CSpriteDesc2D::m_fRoll which makes sense because there is only axis to rotate about, which we now know as the Z axis. In 3D there are now three principal axes about which to rotate. Rotation about the X axis is called pitch and is stored in Sage::CSpriteDesc3D::m_fPitch, and rotation about the Y axis is called yaw and is stored in Sage::CSpriteDesc3D::m_fYaw.
Recall that in 2D we chose positive angles of rotation to be counterclockwise. There is a useful convention for this based on handedness. In a left-handed coordinate system take your left hand, make a fist with your thumb sticking out and pointing along the positive Z axis. Look at your curled fingers from the negative Z side. The direction that they curl is a positive angle of rotation along the Z axis. Your can see from Fig. 4 that this is a counterclockwise direction, which is consistent with our 2D games. You can find the direction of positive rotation about any axis by pointing your thumb in the positive direction and viewing the curl of your fingers from the negative side of the axis.
As mentioned in Section 5.1, previous SAGE games (The Blank Game, The Top Down Game, The Top Down Tiled Game and The Tiled Platformer) use
Sage::CSpriteRenderer(Sage::eSpriteMode::Batched2D)
which draws sprites from back to front in the order that their Draw function is called. In this game we want explicit control of the Z axis, which we get by deriving CRenderer from
Sage::CSpriteRenderer(Sage::eSpriteMode::Unbatched3D)
instead. Now sprites must be draw in descending order of their Z coordinate, which SAGE will do for you if you collect your sprite descriptors into an instance of std::vector<Sage::CSpriteDesc3D> and pass this as a parameter to Sage::CSpriteRenderer::Draw which will sort them by depth (in Z-order) before rendering them. See the SAGE renderer documentation for more details.
What can go wrong if you don't take advantage of Sage's functionality to sort the sprites in this game into descending Z order? Sage uses a Z-buffer to speed up rendering. Unfortunately, Z-buffers count the transparent pixels of the game as having the same depth as non-transparent ones, and therefore refuse to draw the pixels behind a transparent one. This can lead to sprites disappearing behind the transparent pixels of a sprite that was drawn earlier, as in the following examples.
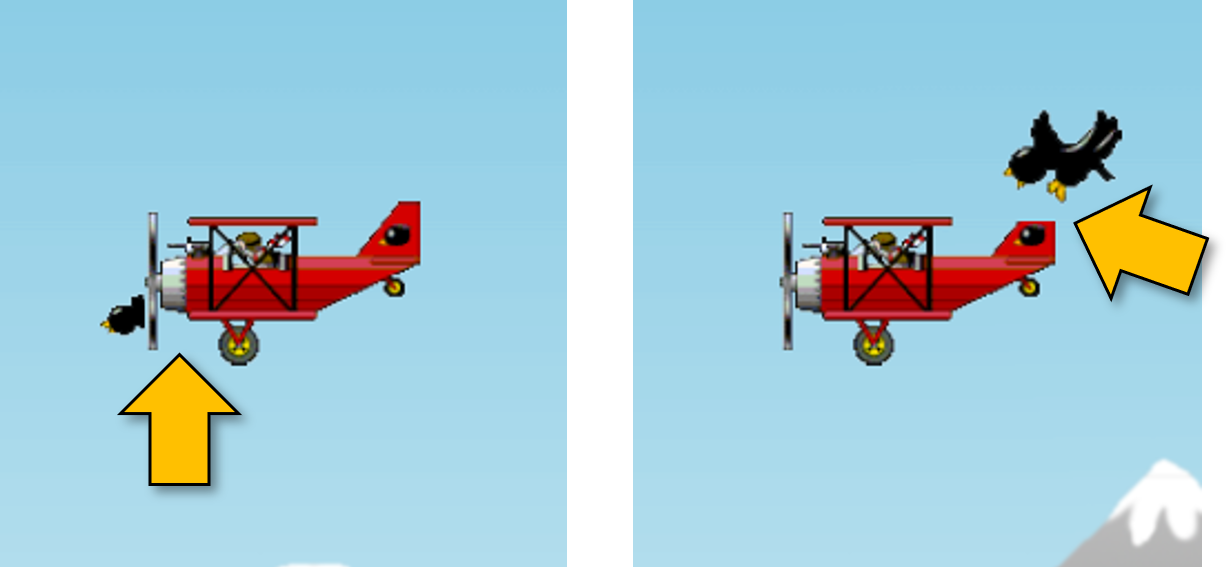
In Fig. 5 (left), the crow's Z coordinate is behind the plane's Z coordinate but the plane is drawn first, resulting in the transparent pixels of the plane sprite canceling out the crow's body (see the yellow arrow) leaving just its head sticking out to the left of the plane. In Fig. 5 (right), the crow's Z coordinate is in front of the plane's Z coordinate but the crow is drawn first, resulting in the transparent pixels of the crow sprite canceling out the part of the plane's tail (see the yellow arrow).
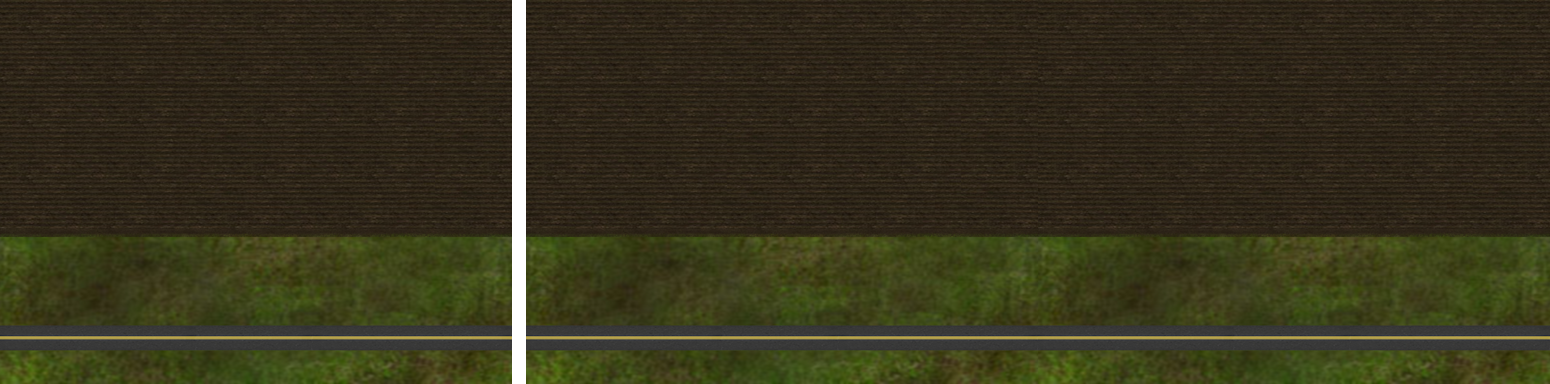
The background for Ned's Turkey Farm consists of a sky image (Fig. 6, left) that can be repeated horizontally without the join showing (Fig. 6, right), and a ground image (Fig. 7, left) that can be repeated horizontally without the join showing (Fig. 7, right).

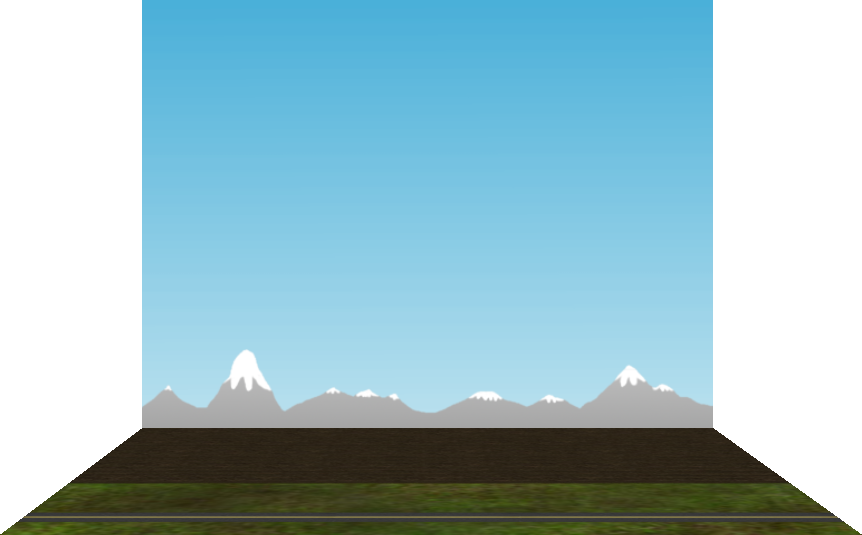
The sky and ground images are put together in an L shape as shown in Fig. 8. This is referred to in the code as a cell. The sky part of the cell is in the XY plane, that is, at right angles to the Z axis. This is the default for sprites when yaw and pitch are set to zero. The ground part of the cell is in the XZ plane, that is, at right angles to the Y axis. We will achieve this by setting its pitch to \(\pi/2\).
The background cells are drawn by CObjectManager::DrawBackground using CObjectManager::m_cSkyDesc for the sky 3D sprite descriptor and CObjectManager::m_cGrndDesc for the ground 3D sprite descriptor. Notice that CObjectManager::m_cGrndDesc.m_fPitch is set to \(\pi/2\) in CObjectManager::Clear. The number of cells drawn is CCommon::m_nNumCells for the game play area plus an extra cell to the left and right for when the camera is near the leftmost and rightmost edge of the play area, respectively. CCommon::m_nNumCells is set to three, so the game world consists of those three cells plus an extra cell at each end for when the view frustum is at the edge of a cell. This is shown in Fig. 9, which you can see by hitting the F3 key (see Section 2 for more keyboard controls).
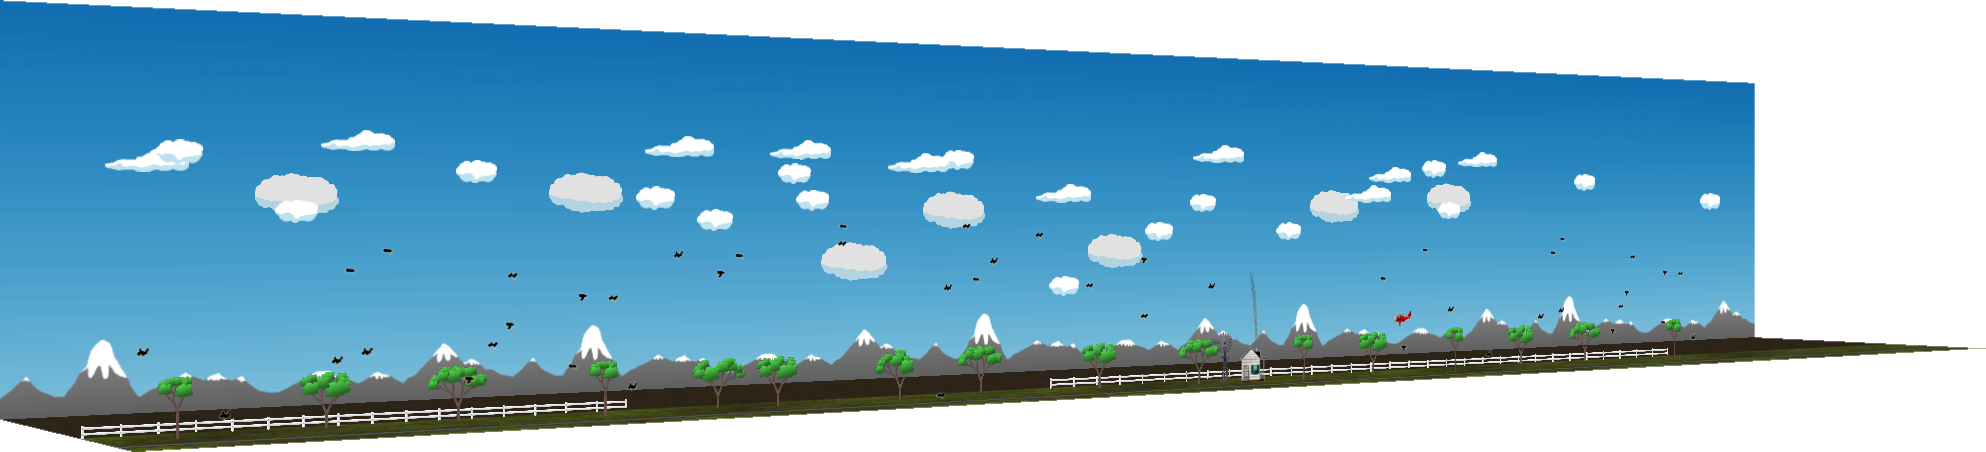
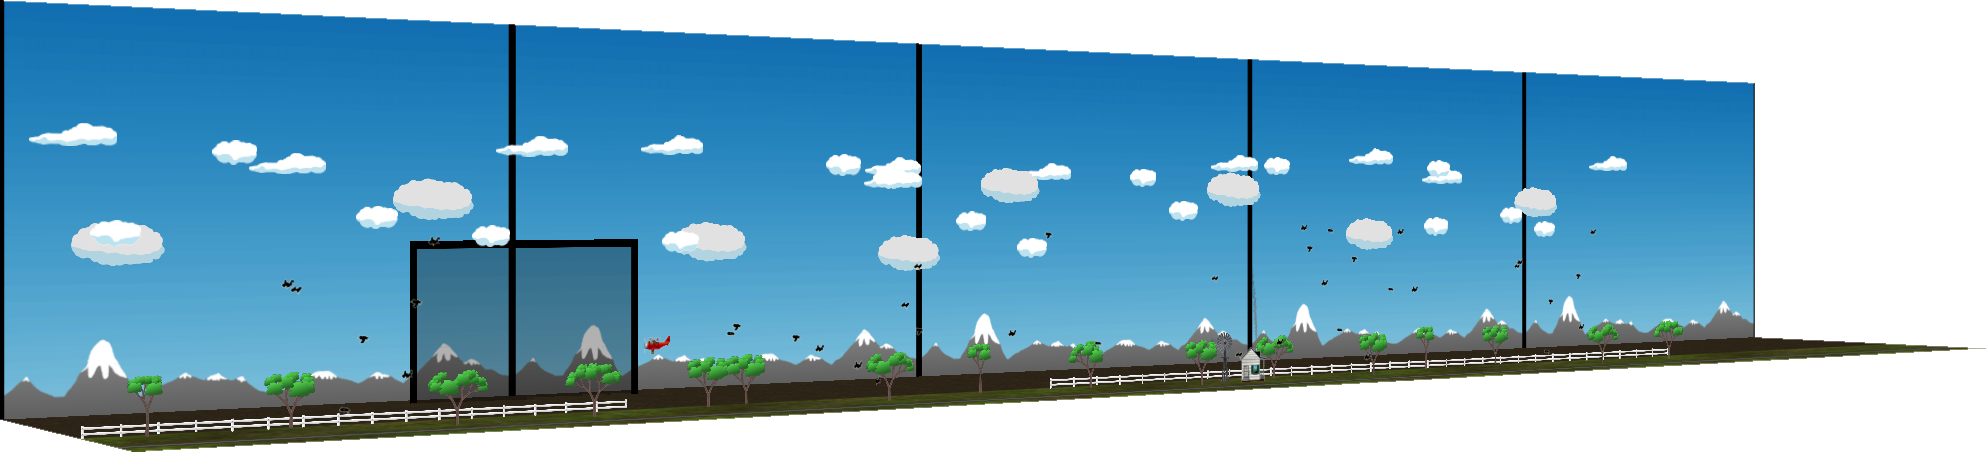
The player is totally oblivious to this and sees a small portion of this world as shown in Fig. 1. They see the contents of the camera's view frustum, the back face of which is drawn as a back rectangle in Fig. 10 and Fig. 11. Fig. 10 shows the plane in its initial position to the right of the game world with the view frustum allowing a view of the background approximately inside the black rectangle. Lines are also drawn on the sky background so that you can see the boundaries between cells more clearly. You can see how the view frustum moves with the plane by hitting the F3 key a second time. (To return to the player view as shown in Fig. 1, hit the F3 key a third time.)
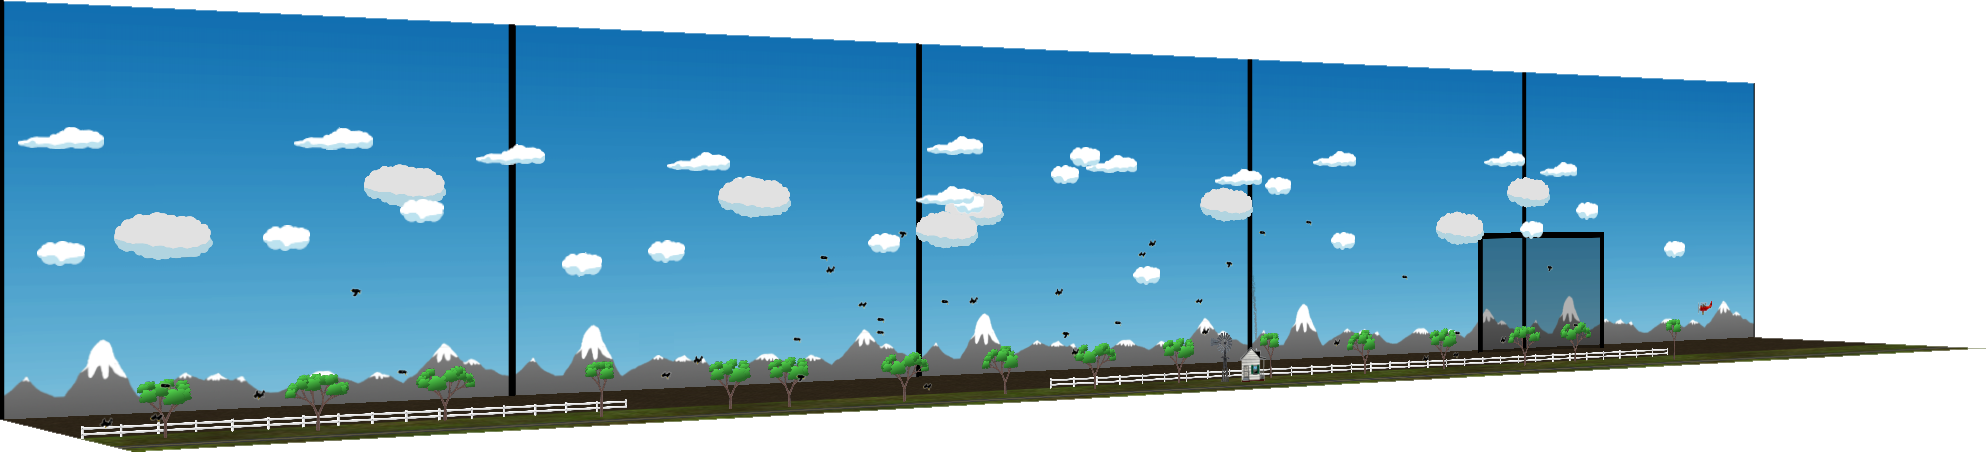
Fig. 11 shows the plane in its leftmost position one frame before being wrapped around to the right of of world to its initial position. The trick here is making the objects inside the view frustum before wrapping around (Fig. 11) also appear in the next frame in which the plane wraps around to the right (Fig. 10). This is done by drawing a second copy of those objects in CObjectManager::GetRenderList, which as already mentioned, will lead to a second plane being drawn out of frustum.
You might want to look at Physics Games and Toys next.