|
Smooth 2D Noise Viewer
Perlin and Value Noise
|
|
Smooth 2D Noise Viewer
Perlin and Value Noise
|
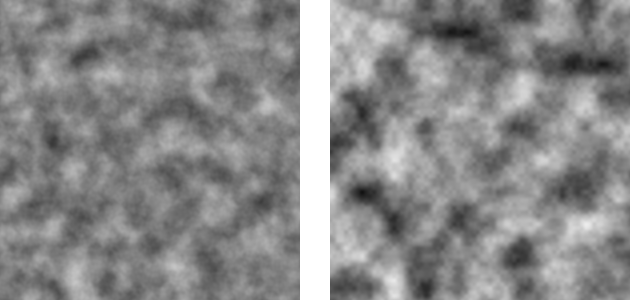
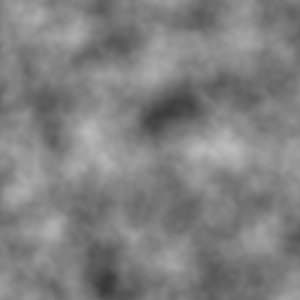
The source code for this basic 2D smooth noise generator, written and maintained by Ian Parberry, is intended to be used by students to learn about Perlin noise. It can generate and save images from 2D Perlin and Value noise (see Figure 1 below for examples).
Students can begin by using the generator to observe what happens when various parameters are changed using the menus described below in Section 4. More advanced students should begin by reading Sections 2 and 3 below before diving into the code, although the code is designed and documented to be read on its own if you prefer to learn bottom-up rather than top-down.
It is assumed that the reader is familiar with the basics of Windows programming such as WinMain, the Window procedure, message passing, and drop-down menus. Main.cpp contains the mandatory Windows functions wWinMain() and a Window procedure WndProc(), which use a single global variable static CMain* g_pMain. The width and height of the client area of the window (and any saved image) are set to 600 in Main.cpp as static const int g_nWidth and static const int g_nHeight. These may be changed in the code at your discretion. Most of the other gnarly Windows-specific code, which used the Win32 API, is hidden away in WindowsHelpers.cpp. Gdi+ is used for the graphics.
The two main classes are CMain, which encapsulates the main body of the code in the approved object-oriented fashion, and CPerlinNoise2D, which generates Perlin and Value noise. CMain draws the noise to a Gdiplus::Bitmap, which is drawn to the application window's client area only on receipt of a WM_PAINT message. Both classes have separate header and code files: CMain is defined in CMain.h and implemented in CMain.cpp; CPerlinNoise2D is defined in Perlin.h and implemented in Perlin.cpp.
Enumerated types (enum class) are used for various properties in the code and are defined in Defines.h. These are named with a leading lower-case e followed by an upper-case letter as follows, eNoise, eHash, eDistribution, eSpline. Windows conventions are somewhat followed in the naming of variables, such as using the prefix m_ for member variables and g_ for global variables.
Assertions are used in the code to aid comprehension and to enforce pre- and post- conditions. When enabled these assertions will have a negative effect on run-time. To disable assertions, comment out the line #define NDEBUG in Includes.h.
This code is a combination of Ken Perlin's original code (see the references below) and various implementations to be found on the internet. One important variation is Value noise, which was apparently invented by an unknown programmer who mistakenly used Perlin's gradient table as a value table instead. More about this later.
Ken Perlin,“An image synthesizer”, Proceedings of the 12th Annual Conference on Computer Graphics and Interactive Techniques (SIGGRAPH 85), pp. 287–296, 1985.
Ken Perlin, “Improving noise”, Proceedings of the 29th Annual Conference on Computer Graphics and Interactive Techniques (SIGGRAPH 02), pp. 681–682, 2002.
Perlin noise computes for each point \((x, y)\) , where \(x\) and \(y\) are floating point numbers, a noise value \(z \in [-1,1]\) that is sufficiently different but varying smoothly from noise values at nearby points. It does this by computing a hash value at the four integer points surrounding \((x, y)\), that is, \(p_0 = (\lfloor x \rfloor, \lfloor y \rfloor)\), \(p_1 = (\lfloor x \rfloor + 1, \lfloor y \rfloor)\), \(p_2 = (\lfloor x \rfloor, \lfloor y \rfloor + 1)\), and \(p_3 = (\lfloor x \rfloor + 1, \lfloor y \rfloor + 1)\), which we will refer to as corners. For convenience, we will call the square made up of four corners and the non-integer points between them as a cell. In the case of Perlin noise, the hashed values are used as indices into a table of gradients CPerlinNoise2D::m_fTable to obtain hashed gradients \(x_i'\) and \(y_i'\) at the four corners \(p_i\), respectively, for \(0 \leq i < 4\). The fractional parts of \(x\) and \(y\), \(x_f = x - \lfloor x \rfloor\) and \(y_f = y - \lfloor y \rfloor\) are smoothed using a spline function (see below) to get \(x_s\) and \(y_s\). Next, linearly interpolate by \(x_s\) between \(x_f x_0' + y_f y_0'\) and \(x_f x_1' + y_f y_1'\) along the top corners to get a value \(a\) and \(x_f x_1' + y_f (y_1'-1)\) and \(x_f x_2' + y_f (y_2'-1)\) along the bottom corners to get a value \(b\). Finally, linearly interpolate by \(x_s\) between \(a\) and \(b\) to get the result \(z\). Value noise is similar, except that it treats the contents of CPerlinNoise2D::m_fTable directly as values, not gradients.
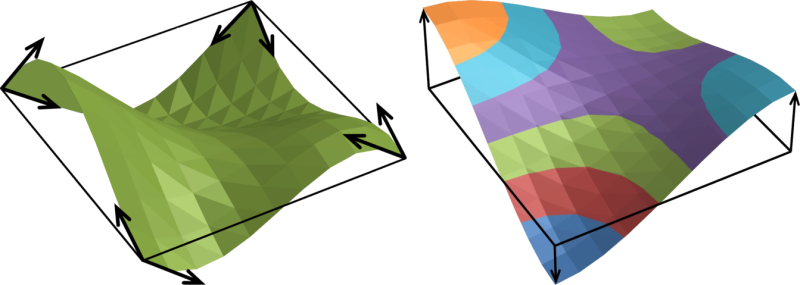
The process described in the previous paragraph is implemented as CPerlinNoise2D::noise(). If \(z\) is interpreted as a height value for the corresponding 2D point \((x, y)\), then an example of the surface generated by Perlin noise is shown in Fig. 2 (left), and one by Value noise is shown in Fig. 2 (right). The corner points have integer coordinates and the arrows indicate \(x\) and \(y\) gradients (left) and values (right).
Note that CPerlinNoise2D::noise() does not explicitly create this surface, but computes the \(z\) value of a single 2D point without reference to \(z\) values of any other points. However, some applications of 2D Perlin noise such as texture generation, a speed-up can be obtained by amortizing the calculations over the whole surface in each cell, as described in the following:
Ian Parberry, “Amortized Noise”, Journal of Computer Graphics Techniques, Vol. 3, No. 2, pp. 31-47, 2014.
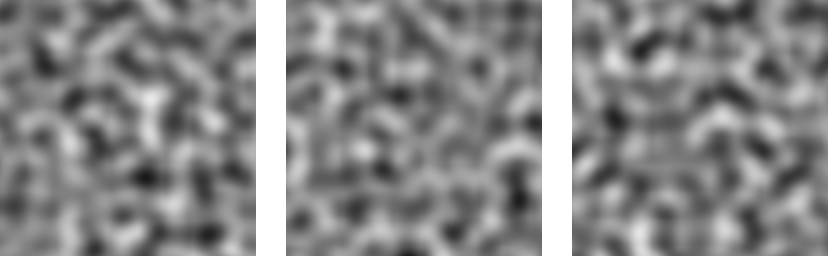
The algorithm described in this section computes what is called a single octave of Perlin noise, which looks like the three examples in Fig. 3.
The width of a cell of Perlin noise can be called its wavelength and the difference between the lowest \(z\) value and the highest \(z\) value its amplitude. The algorithm above generates noise with wavelength \(1\) and amplitude \(2\). CPerlinNoise2D::generate adds multiple octaves of Perlin or Value noise, scaling down the amplitude by a value called the lacunarity and scaling down the wavelength by multiplying the \(x\) and \(y\) coordinates by a value called the persistence. CPerlinNoise2D::generate allows you to specify the lacunarity and the persistence, but they are currently set to the common default values of \(0.5\) and \(2\), respectively. The number of octaves can be chosen using the Settings menu (see Section 4.7).

Suppose \(x \in [0,1]\). The cubic spline of \(x\) is defined to be \(3x^2 - 2x^3\), and the quintic spline of \(x\) is defined to be \(10x^3 - 15x^4 + 6x^5\). These are implemented in CPerlinNoise2D::spline3() and CPerlinNoise2D::spline5, respectively. Perlin's original implementation used cubic splines for speed, but later implementation used quintic splines for smoothness. Fig. 5 shows Spline curves (left), their derivatives (center) and second derivatives (right).
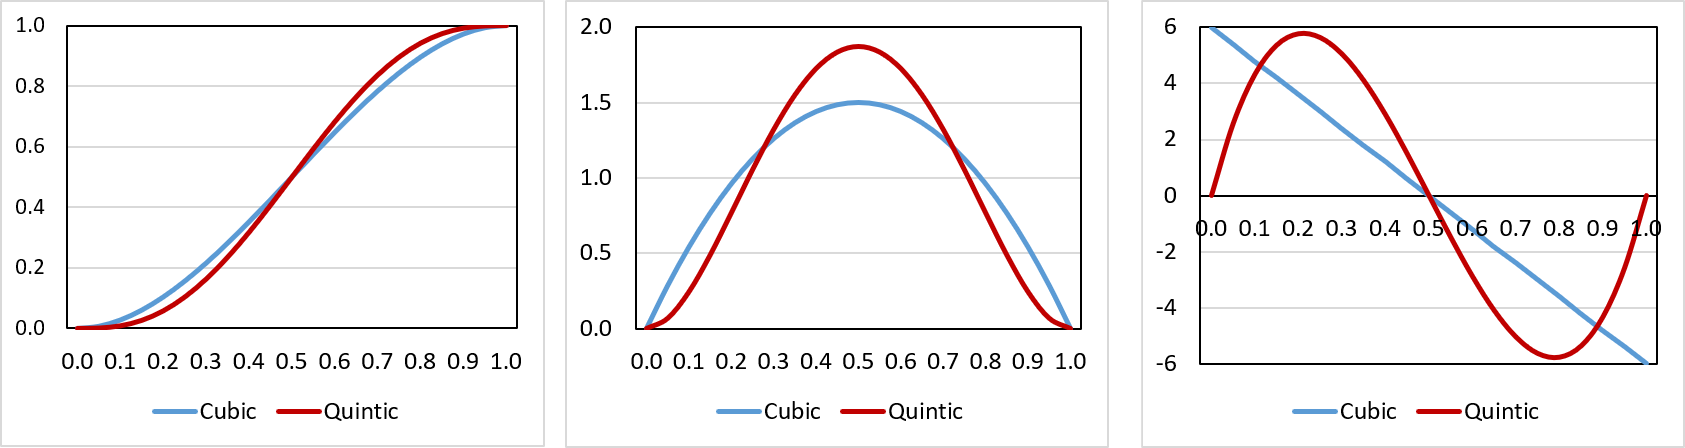
Looking at the derivatives and second derivatives in Fig. 5, you can see that the gradient of cubic spline is not smooth, but that of the quintic spline is. This matters very little in applications in which there is a great amount of quantization, but does generate slightly different results, as can be seen in the animated gif in Fig. 6.
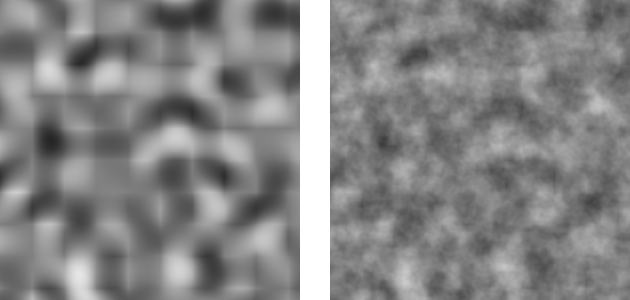
It is tempting to use no spline function at all, which looks particularly bad when the number of octaves is small (see Fig. 7, left) but not so bad with enough octaves (see Fig. 7, right).
The spline function can be chosen using the Spline menu (see Section 4.6).
The gradient/value table is stored in CPerlinNoise2D::m_fTable. Most implementations of Perlin noise fill this table with pseudo-random values from \([-1,1]\) chosen from a uniform distribution. The size of this table doesn't matter unless it is very small. The table size in this implementation is CPerlinNoise2D::m_nSizeand can be modified using the Settings menu (see Section 4.7).
As shown in the following papers, it is often useful to fill the table with values chosen pseudo-randomly from other distributions.
Ian Parberry, “Designer Worlds: Procedural Generation of Infinite Terrain from Real-World Elevation Data”, Journal of Computer Graphics Techniques, Vol. 3, No. 1, pp. 74-85, 2014.
Ian Parberry, “Modeling Real-World Terrain with Exponentially Distributed Noise”, Journal of Computer Graphics Techniques, Vol. 4, No. 2, pp. 1-9, 2015.
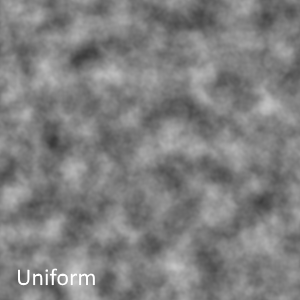
The gradient/value table distribution can be changed using the Distribution menu (see Section 4.4). The table is filled with pseudo-random values using the appropriate std::distribution applied to an instance of std::default_random_engine in a set of functions controlled from a switch statement in CPerlinNoise2D::RandomizeTable. Examples of Perlin noise generated using the various distributions available for the gradient/value table are shown in Fig. 8.
Perlin's original implementation used a random permutation as a hash function, resulting in noise that repeats with a frequency equal to the size of the permutation (we use CPerlinNoise2D::m_nSize for the size of the permutation as well as the size of the gradient/value table, for obvious reasons. This permutation was chosen using a variant of the standard pseudo-random permutation generation algorithm, although in later versions a fixed permutation was used. This implementation re-instates the pseudo-random permutation since we want the user to be able to change the permutation size.
The permutation is stored in CPerlinNoise2D::m_nPerm and set in CPerlinNoise2D::RandomizePermutation(). Perlin's 1D has function is CPerlinNoise2D::hash(), and his 2D function consists of a pairing function to combine a pair of coordinates into one, followed by a 1D hash function. Perlin's pairing function is CPerlinNoise2D::pair().
To avoid the repeats inherent in using a permutation as a hash function at the cost of increased running time, we can use, for example, a 2D linear congruential hash function such as the one implemented in CPerlinNoise2D::hash2() which on input \(x, y\) returns \((p_0x + p_1y) \bmod p_2 \) (for hard-coded primes \(p_0, p_1, p_2\)) right-shifted by 8 bits and masked with m_nMask.
A better alternative would be to use a modern 1D hash function such as std::hash. This is implemented in CPerlinNoise2D::hashstd(), and required a slightly different pairing function implemented in CPerlinNoise2D::pairstd(). The hash function can be changed using the Hash menu (see Section 4.5).
The grayscale bitmap is constructed in CMain::GenerateNoiseBitmap, which calls CPerlinNoise2D::generate to generate a value in \([-1, 1]\) that is mapped to a grayscale value in the obvious manner. CMain::m_fScale. Since Perlin noise return a zero value at integer coordinates (and Value noise returns a hashed one), it is necessary to divide these coordinates by CMain::m_fScale. The scale is equal to the cell size, so increasing the scale has the effect of appearing to zoom in closer to the noise. Scale can be changed using the Settings menu (see Section 4.7).
The menu bar at the top of the application window has eight drop-down menus, File, Generate, View, Distribution, Hash, Spline, Settings, and Help , as follows.
File Menu
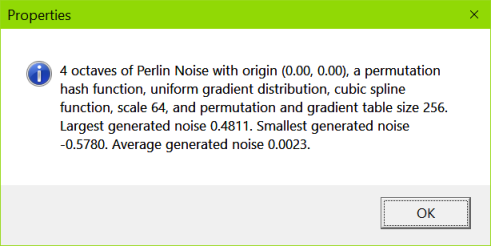
The File menu lets you Save the current image, view its noise Properties, or Quit the application. The Save option actually pops up a Windows Save as dialog box with a default file name munged together in function CMain::GetFileName() from the noise properties. Only png format is supported at present, but the obvious changes can be made to function SaveBitmap() in WindowsHelpers.cpp to allow other formats. Selecting Properties will display the information shown in the following dialog box.
Generate Menu
The Generate menu lets you generate either Perlin or Value noise. There will be a checkmark next to the current noise type. Selecting Jump will jump the position of the top-left corner of the image by adding the table size to the \(x\) and \(y\) coordinates of the origin (the top left corner of the image). Note that Jump will have no effect on the noise image if the permutation hash function is used because Perlin noise repeats itself with frequency equal to the table size, but it will have effect if std::hash is used (see Section 4.5 for the Hash menu). The change in origin will be recorded in the Properties dialog box described in Section 4.1, and it will be visible if Coordinates is checked in the View menu (see Section 4.3). Selecting Reset origin will reset the origin to \((0, 0)\). Selecting Randomize will re-randomize the gradient/value table.
View Menu
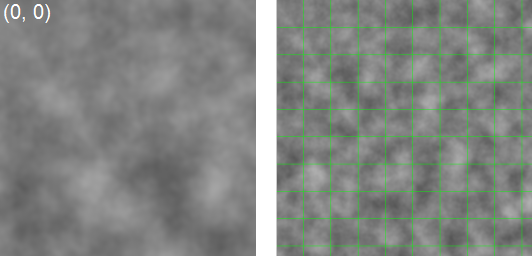
Selecting Coordinates from the View menu will toggle the drawing of the noise coordinates of the top-left and bottom-right pixels of the bitmap. Selecting Grid will toggle the drawing of a grid at integer points. The following image shows at left the top-left corner of a noise bitmap with the coordinates of the top-left pixel, and at right a noise bitmap with grid lines drawn.
Distribution Menu
The Distribution menu lets you fill the gradient/value table with pseudo-random values in the range \([-1, 1]\) drawn from either a uniform distribution, the cosine of values in the range \([0, \pi]\) from a uniform distribution, values from a normal distribution, an exponential distribution, or a distribution constructed using midpoint displacement. There will be a checkmark next to the current distribution.
Hash Menu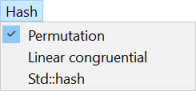
The Hash menu lets you pick the hash function, either the Perlin hash function using a pseudo-random permutation, a 2D linear congruential hash function, or std::hash. There will be a checkmark next to the current hash function.
Spline Menu
The Spline menu lets you pick the spline function, either no spline function, cubic spline, or quintic spline. There will be a checkmark next to the current spline function.
Settings Menu
The Settings menu lets you increment or decrement the number of octaves of noise, scale the image up or down by a factor of two, and scale the gradient/value table up or down by a factor of two. Selecting Reset to defaults resets these three values to their defaults. The actual values of these properties can be found in the Properties dialog box described in Section 4.1.
Help Menu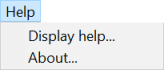
The Help menu has two entries, Display help which opens up this documentation in a browser, and About which displays the About dialog box.